Sunday 11 November 2012

Blog update

Today we submitted our assignments and ruby, kate, Laura, Julia, Zara and I went onto the oval and tried our trebuchet by replacing it on a plank of wood run way.
We found that giving it a push and releasing it at the end gave it the larger distance. Ruby and ours ended up going the furtherest which we are proud of.

Monday 5 November 2012

Blog Update

Today Mr Ward went over how to do the written part of the assessment. He talked us through the entire theory element of the assessment, calculating the PE, Velocity and KE. I found that by calculating the final KE, it really helped for writing the end of unit evaluation and I re-worte my evaluation based on my new calculations.

So all I have to do now is print the assessment and it will be ready to hand in.

Sunday 4 November 2012

Blog update

Today ruby and I went into the workshop and I just added a bit of reinforcement to the arm.
I ten found some string and used that for the release contraption because, they used them in old times and it is just really fun to cut the rope and let it fling away. I finished my calculations and my assignment is ready to priny

Friday 2 November 2012

Photos of early planning

I am uploading these so I can as them to my assessment

Blog update

Last lesson ruby and I tested our trebuchet and took recordings for our handed in assessment. We went to outside boarders and the chapel because we though that that would be the flattest place and we could get an accurate shot from that. Our first two releases went in the 10m mark but the other 3 (we would release the ball 5 times to get a good average) it would a only go around 5m because it would crash into the bushes.

The results were:
Average Distance: 7564.6mm
Average Time: 2.116sec
Mass: 145.4g

We still need to record the height but I will have to ask mr ward about that and where we measure it from. We decided to to re record the last 3 distances because it is part of the assessment and it will give us something to talk about in he evaluation.

Monday 29 October 2012

Blog Update

Today ruby and I got our catapult finished. It was really good. We started off by adjusting the axel at the top so that the dimensions fitted the trebuchet. We then worked on attaching the cup to the end of the propellor. We first tried making a stand for it but then Mr ward said it should be fine how it is. With the help of Mr Ward we then screwed holes in the bottom and this took a bit of adjusting so that the Asclepius in which the wheels are to rotate off can rotate. But after that, it was just a press fit of the wheels and then the catapult was ready.

First using a 1kg weight that was hooked to our swing, we propelled the ball from outside the classroom and it reached about the drains. We then advanced and added a 2kg weight and the ball went further. I think next lesson we will just reinforce the pole at the end closest to the axel because the wood is beginning to split. But after that then we will do our recordings and I will video it so I can not step by step, the process in which the catapult takes.

Sunday 28 October 2012

Blog Update

Today ruby and I got straight into the workshop. But before we did that we made sure that we could do tomorrow lunchtime to get more of it done so that we had plenty of time to get the whole assessment done before the due date. 

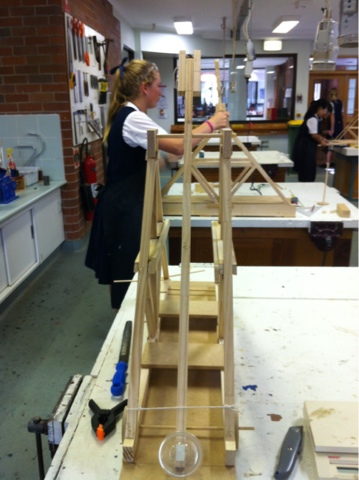
We started off by finishing the extenctions and support to the top of the A-Frame, which glued well. We then got Mr. Ward to help, and Ruby drilled a hole in our sling, this was a factor that made it line up with the bottom of the A-frame, not the full catapult end. This would allow us to have more force pulling down on the weight end of the sling. 
Mr Ward then drilled a hole through the other A-frame and we managed to get the whole top part lined up with not too many issues due to the un-allignment of the frames. 

I then drilled a hole through the bottom of the sling where we would hang our weight off. I was nervous but I was able to do it fairly well and it was good that I was made to do it under controlled conditions so it was harder for me to do something wrong. I also hammered the rod through that Mr Ward measured out to be a press fit and then I sanded it smooth. 

Ruby then had the idea to cut a wheel in half and use it for the pin holder. It looks really good but we will finish it later when we know the full dimentions of our cup.